
What to Wear: The Biggest Question Every Client Asks
This is almost always the first thing people stress about, so let’s just tackle it right out of the gate.
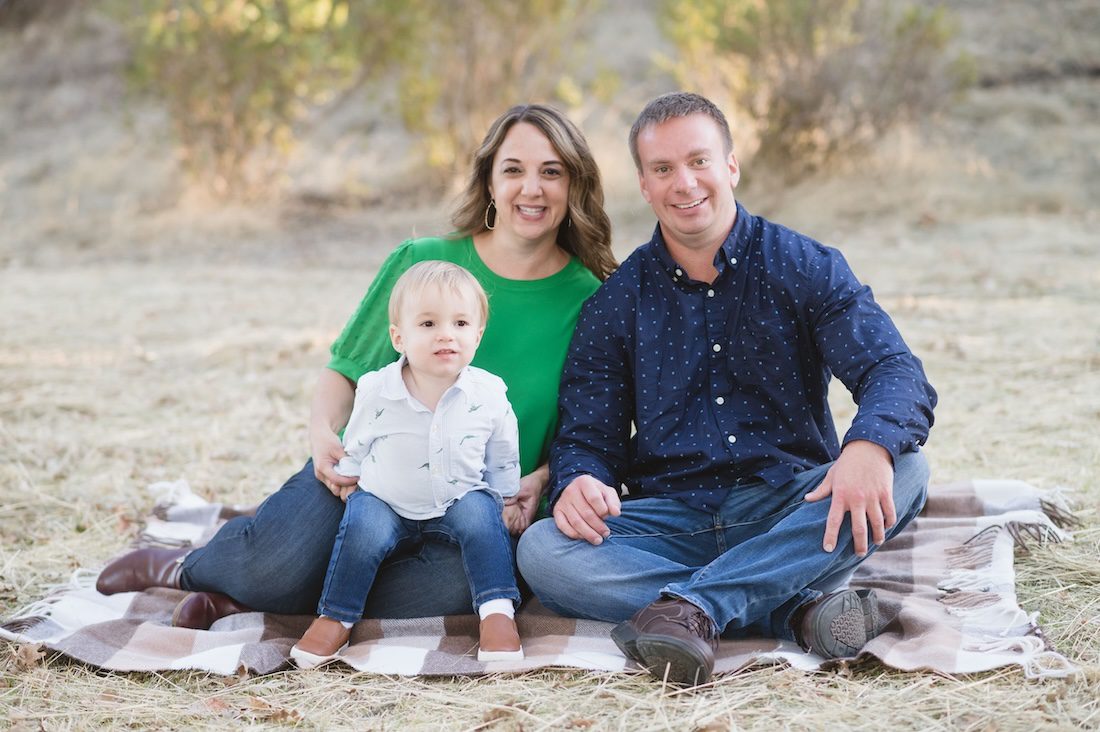
The Golden Rule: Coordinate, Don’t Match
Matching outfits had their moment. That moment was 1994. Now, the goal is coordination, meaning everyone looks like they belong together without looking like they ordered the same thing off Amazon.
Here’s how to do it:
- Pick YOUR outfit first. Choose something that makes you feel genuinely beautiful, not just comfortable or fine. When you love what you’re wearing, it shows.
- Pull 2-3 colors from your outfit and build everyone else around those.
- Mix textures and layers to add visual interest without clashing.
Example: You’re wearing a floral pattern with pinks, purples, and greens. Your partner wears a green and purple shirt. One kid wears a green top with neutral bottoms. Another kid wears a pink dress. See how that works? Cohesive without being matchy.
Style Tips That Actually Matter
A few things I always tell my clients:
- Aim for 2 outfits if you’re not in a mini session. One more formal or flowy option, one more casual. It gives you variety and honestly makes the gallery more interesting.
- Avoid logos, giant graphics, and crazy busy patterns. They pull attention away from your faces, and your faces are the whole point.
- Accessorize. Belts, earrings, bow ties, scarves, hats, necklaces. Accessories make outfits look finished and intentional in photos.
- Iron the night before. Then hang everything. If you’re wearing something that wrinkles easily, just change at the location rather than wearing it in the car.
- Check for bra straps and underwear lines before the day of. Sit down, stand up, move around. Whatever peeks out during regular movement will definitely peek out in photos.
What Colors Photograph Best
Soft, warm, and earthy tones tend to be timeless. Bright, saturated colors can work great but make sure they coordinate. Avoid neon. Avoid white on white (it can blow out in bright light).
Also, think about where you’re hanging the images. If your living room has warm earthy tones, wearing jewel tones might clash in the final framing. If you want wall art, factor in your home decor.
Skin + Hair + Beauty Prep (Start Early!)
This section surprises people because most of it starts BEFORE the day of the session. Don’t skip it.
Skin
- Start moisturizing nightly at least a week before. Dry, flaky skin shows up in photos, especially on arms, shoulders, and face. After showering, while your skin is still lightly damp, apply moisturizer everywhere that will be visible.
- No lotion with sparkle or shimmer. I know it feels luxurious but it does weird things under camera light and you won’t love it.
- ProTip for dry patches: Mix a cup of sugar with about a quarter cup of olive oil until it’s the texture of wet sand. Scrub any flaky areas, rinse, then wash with soap. Works like a charm around the nose especially.
- Use a facial moisturizer on your face specifically. Regular body lotion is too thick for facial skin and can cause breakouts.
- Follow your regular cleansing routine morning and night for the 2 weeks before. Don’t try anything new right before a shoot.
- Avoid high-salt and high-fat foods for a couple days before if bloating tends to affect your confidence.
Hair
- If you’re getting a haircut, do it about a week before. That gives you time to get used to it and adjust if needed.
- Men: a fresh cut 2-3 days before is perfect.
- If you’re curling your hair, use hairspray. Curls can fall by the time we start shooting.
- Bring bobby pins, clips, or a headband in case it’s windy outside. Even indoor sessions benefit from having a backup option.
Makeup
- Soft and natural is almost always the best approach. You want to look like you on your best day, not like a different person.
- Foundation and concealer: make sure your shade actually matches your skin. If it’s a touch off, it can look orange or yellow next to your neck and body in photos.
- If you don’t usually wear foundation, BB cream from any pharmacy is a great middle ground. It evens out skin tone without feeling heavy.
- A little mascara and even a pale lipstick helps your eyes and face pop in photos. Totally optional but it makes a difference.
- Don’t cake on coverage trying to hide a blemish. It’s genuinely easier for me to edit out a pimple than to clean up overdone makeup in editing. Promise.
- Consider hiring a makeup artist. It’s not as expensive as you think, and honestly it’s relaxing to just sit there and be taken care of before your session.
A Few Specifics People Always Forget
- Lips: Use lip balm for a few days before. Bring your lip gloss or lipstick for touch-ups during the session because you will definitely lick your lips.
- Glasses: If people wouldn’t recognize you without your glasses, wear them! To avoid glare, you can have the lenses popped out for the shoot (seriously, this is what Hollywood does), or grab a cheap duplicate frame from a dollar store.
- Facial hair: Ladies, wax or use a hair remover for any light facial hair at least a few days before. Even barely-there fuzz can show up. Men, trim up the beard or goatee and hunt for any stray wiry hairs.
- Eyebrows: Everyone should clean up their brows.
- Nails: A fresh coat of polish in a neutral, coordinating color makes a real difference. Or a clean, tidy natural nail. Either works. Just make sure the cuticles are tended.
- Teeth: If you want to whiten, start 2-3 weeks before. Last minute whitening can cause sensitivity and it won’t fully set in time anyway.
- Red eyes: Sleep the night before. Don’t drink the night before either. (Yes, I have photographed hungover clients. Bless their hearts.) Moisturizing eye drops help when all else fails.
- Sunburns and tan lines: If your session is Saturday, don’t go to the beach Friday. Give yourself at least a week between tanning and your shoot. Spray tans especially need 3-7 days to settle into their final color.
Kids at Sessions: The Real Talk Section
This is the section I wish someone had handed me before my own family sessions decades ago.
Kids are amazing and unpredictable and wonderful and exhausting all at once. A little planning goes a long way.
Timing Is Everything
- Schedule the session around nap times, not through them. A well-rested kid is a completely different experience than a tired one.
- Don’t schedule right before a normal meal. Hungry kids are not cooperative kids. We’ll talk snacks in a second.
- Give yourself extra travel time. Rushing adds stress to everyone, especially little ones who pick up on your energy.
Snacks: What to Bring and What to Leave in the Car
This matters more than people think. The goal is something that gives them a little energy boost without making a mess on their outfits 3 minutes before we start shooting.
Bring these:
- String cheese (not messy, protein, kids almost universally love it)
- Goldfish crackers or pretzels in a small container
- Apple slices in a baggie
- Grapes or blueberries (easy to eat, no sticky residue)
- Mini rice cakes
- Fruit pouches for younger kids (sealed until needed)
Leave these in the car:
- Anything with red dye or heavy food coloring. One juice box spill and that white shirt is done.
- Chocolate. Just trust me on this one.
- Anything sticky: gummy bears, fruit snacks, caramel, honey packets
- Chips or anything with heavy seasoning that will end up on their hands and face
- Anything that requires a lot of chewing and might make them too tired or cranky to smile
ProTip: bring wipes. Always bring wipes. Even if you think you won’t need them, bring them.
Keeping Kids Engaged
- Let them know the session is a special outing, not a chore. Build a little excitement around it.
- Give older kids one say in something: a prop they want to bring, a pose they want to try, a color in their outfit. Ownership = cooperation.
- Bring a small comfort item for toddlers if they have one. A favorite stuffed animal can be used as a prop and also helps them feel safe in a new environment.
- I am very good at making kids laugh and feel comfortable. Your job is not to manage their behavior during the session, that’s my job. Your job is to just be relaxed and have fun with them.
- Don’t threaten or bribe with screens right before. It’s hard to get kids to disengage and transition into a session when they’re in the middle of a video.
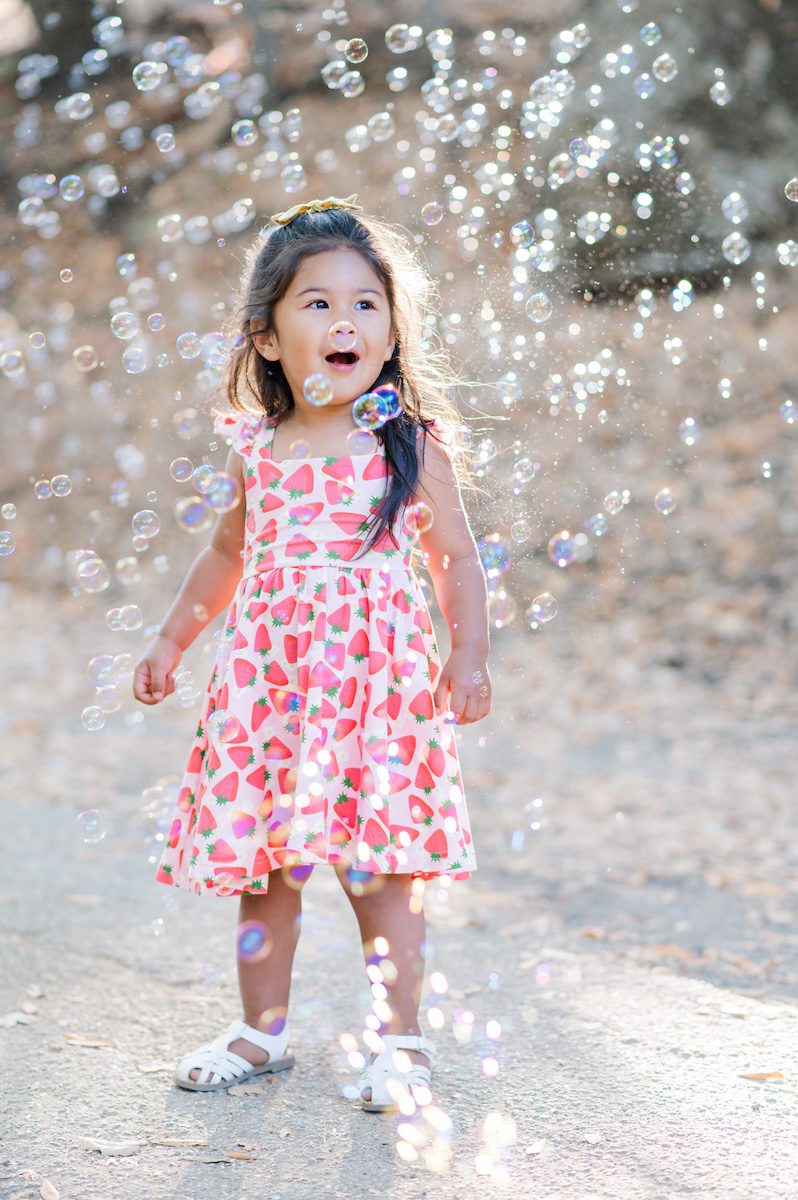
What to Wear for Kids
- Layer where possible. A cardigan or light jacket over an outfit gives you options if something spills.
- Comfortable shoes. Kids who are uncomfortable in their shoes will tell you, loudly, and often with their whole body.
- Bring a backup outfit for toddlers especially. Accidents happen.
- Coordinate their outfits with the family palette, but let them have some personality in it. A kid who feels cool in what they’re wearing is going to look a lot better in photos.
Props: Yes or No?
Totally optional, but they can be really fun.
Some ideas that have worked really well in sessions:
- Colorful balloons. Simple, festive, genuinely joyful in photos.
- Seasonal items: blankets, hats, and scarves in fall and winter. Umbrellas for a rainy day shoot.
- A picnic basket with your favorite foods for a spring or outdoor session.
- Something meaningful to your family: a football, a guitar, a favorite book, his-and-hers mugs.
- Flowers, either from the garden or a quick stop at a farmers market.
If you’re not sure, I love it when clients ask me in advance. I can tell you pretty quickly whether a prop will work in the space we’re shooting or not.
The Day Of: What to Actually Do
You’ve done all the prep. Here’s how to make the day itself go smoothly.
- Eat a real meal before you come. Not a heavy meal, but don’t show up hungry. A hungry photographer or a hungry client are both not ideal (I may or may not speak from experience here).
- Give yourself more time than you think you need to get there. Factor in traffic, parking, and wrangling everyone into their final outfits if needed.
- Bring touch-up essentials in your bag: lip gloss, a comb or brush, hairspray, wipes, your child’s comfort item if they have one, and a small snack.
- Wear your outfit from home if it travels well. Change at the location if it wrinkles easily.
- Leave your phone in your bag during the session. Be present. The photos will reflect it.
- Trust the process. I know what I’m doing. Your job is just to show up and have fun.
The Best Tip of All
Confidence.
Genuinely, that’s it. That’s the secret. All the prep in the world helps build confidence, and confidence is what makes photos sing. Most people feel awkward in front of a camera. That is completely normal and I promise you, that’s what I’m here for. Guiding you, making you laugh, adjusting your angles, helping the kids feel comfortable. You don’t have to show up knowing how to pose. You just have to show up.
You can do this. I believe in you. And I cannot wait to see what we create together.
If you want to schedule a portrait session, send me a message!
What To Wear Inspiration


Click Below to save these to your Pinterest Board!